How to Set Up Microsoft Azure Focus Export with nOps Platform
Prerequisites
-
nOps Platform Access: Organization Settings permissions in your nOps account
-
Azure Portal Access with billing scope permissions:
- EA: Enterprise Administrator or Billing Account Contributor
- MCA: Billing Account/Profile Owner or Contributor
-
Supported Account Types:
- ✅ Enterprise Agreement (EA)
- ✅ Microsoft Customer Agreement (MCA)
- ❌ MOSP / Pay-as-you-go (must upgrade to EA or MCA)
- ❌ CSP (Cloud Solution Provider) — not supported
-
Global Admin Access (Optional): Required if billing scopes aren't visible
Understanding Billing Scopes
You must create a FOCUS export and configure a nOps integration for each billing account in your organization. A single billing account export covers all subscriptions under it, but if you have multiple billing accounts, each one requires its own setup.
Billing Scope Hierarchy
Enterprise Agreement (EA):
Billing Account (EA Enrollment)  ← Create export here
  └── Department (optional)
      └── Enrollment Account
          └── Subscription
Microsoft Customer Agreement (MCA):
Billing Account                  ← Create export here (recommended)
  └── Billing Profile            ← Or here (for separate business units)
      └── Invoice Section
          └── Subscription
Setup Steps
Step 1: Select Your Billing Scope (Azure)
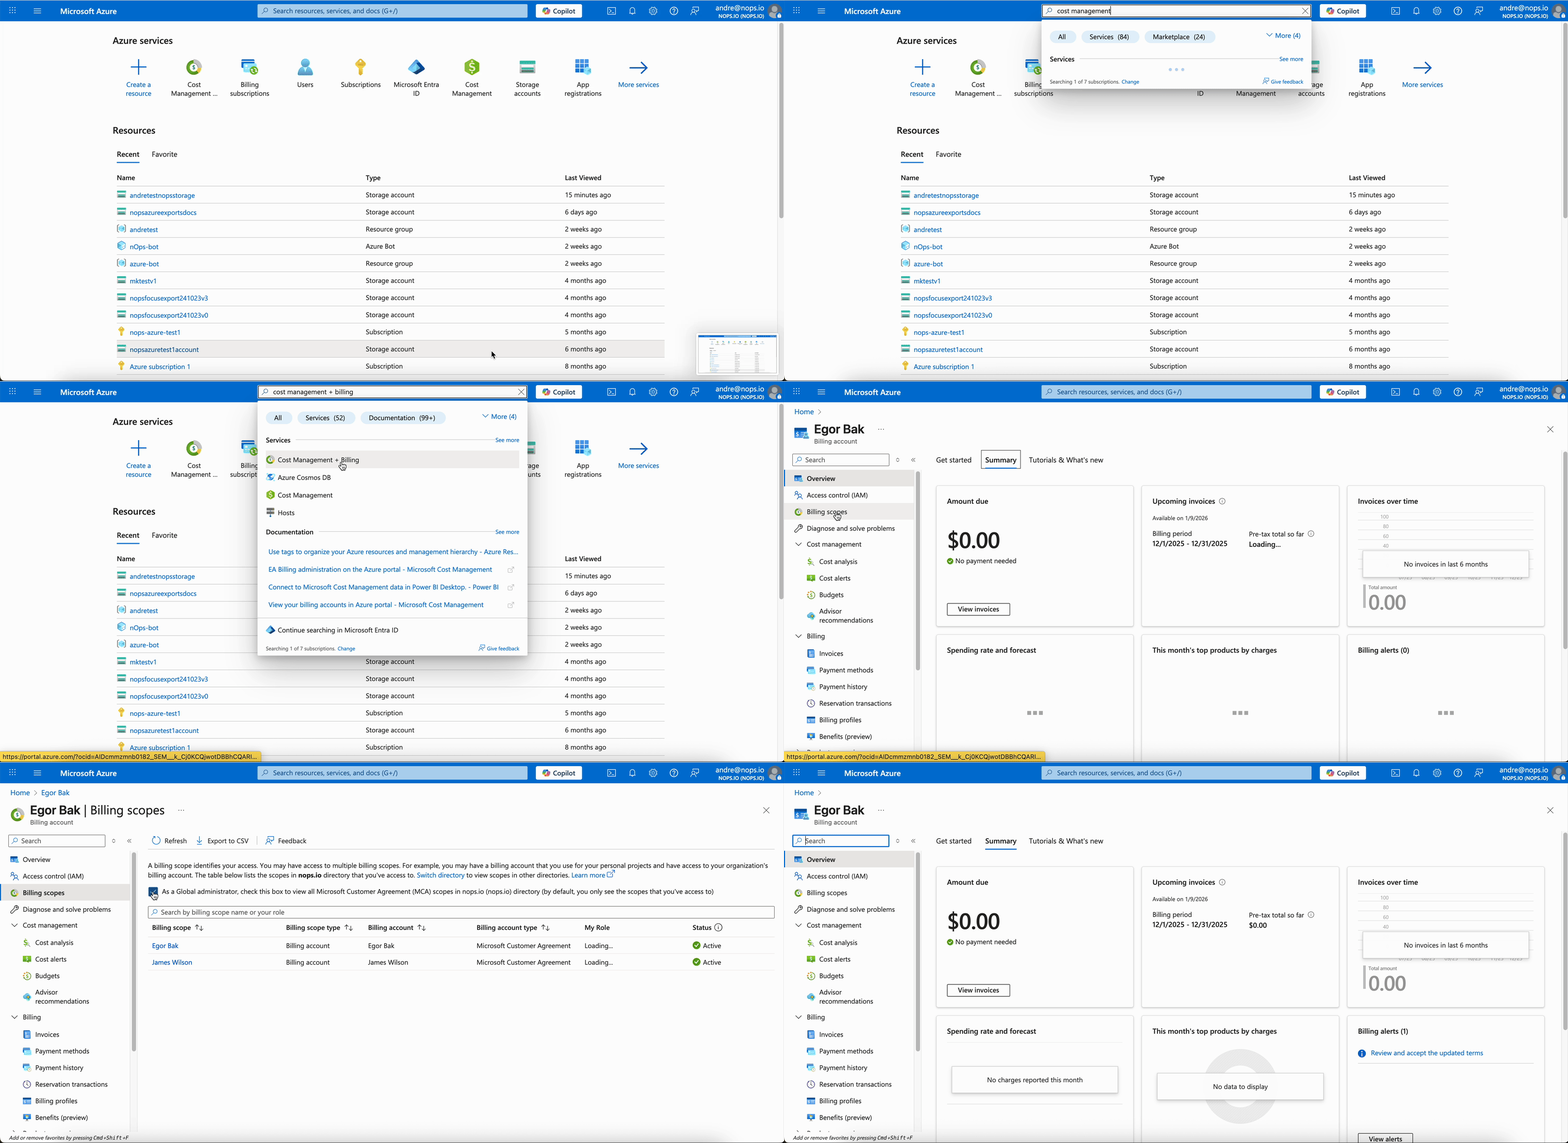
- Log in to Azure Portal and search for Cost Management + Billing
- Click Billing scopes in the left sidebar
- Select your Billing Account:
- EA: Look for "Billing Account - [Enrollment Number]"
- MCA: Look for "Billing Account" with type "Microsoft Customer Agreement"

Enable "As a Global administrator" toggle, or contact your EA/MCA administrator for appropriate permissions.
If you see multiple billing accounts listed, you'll need to complete Steps 1-4 for each one.
Step 2: Create the FOCUS Export (Azure)
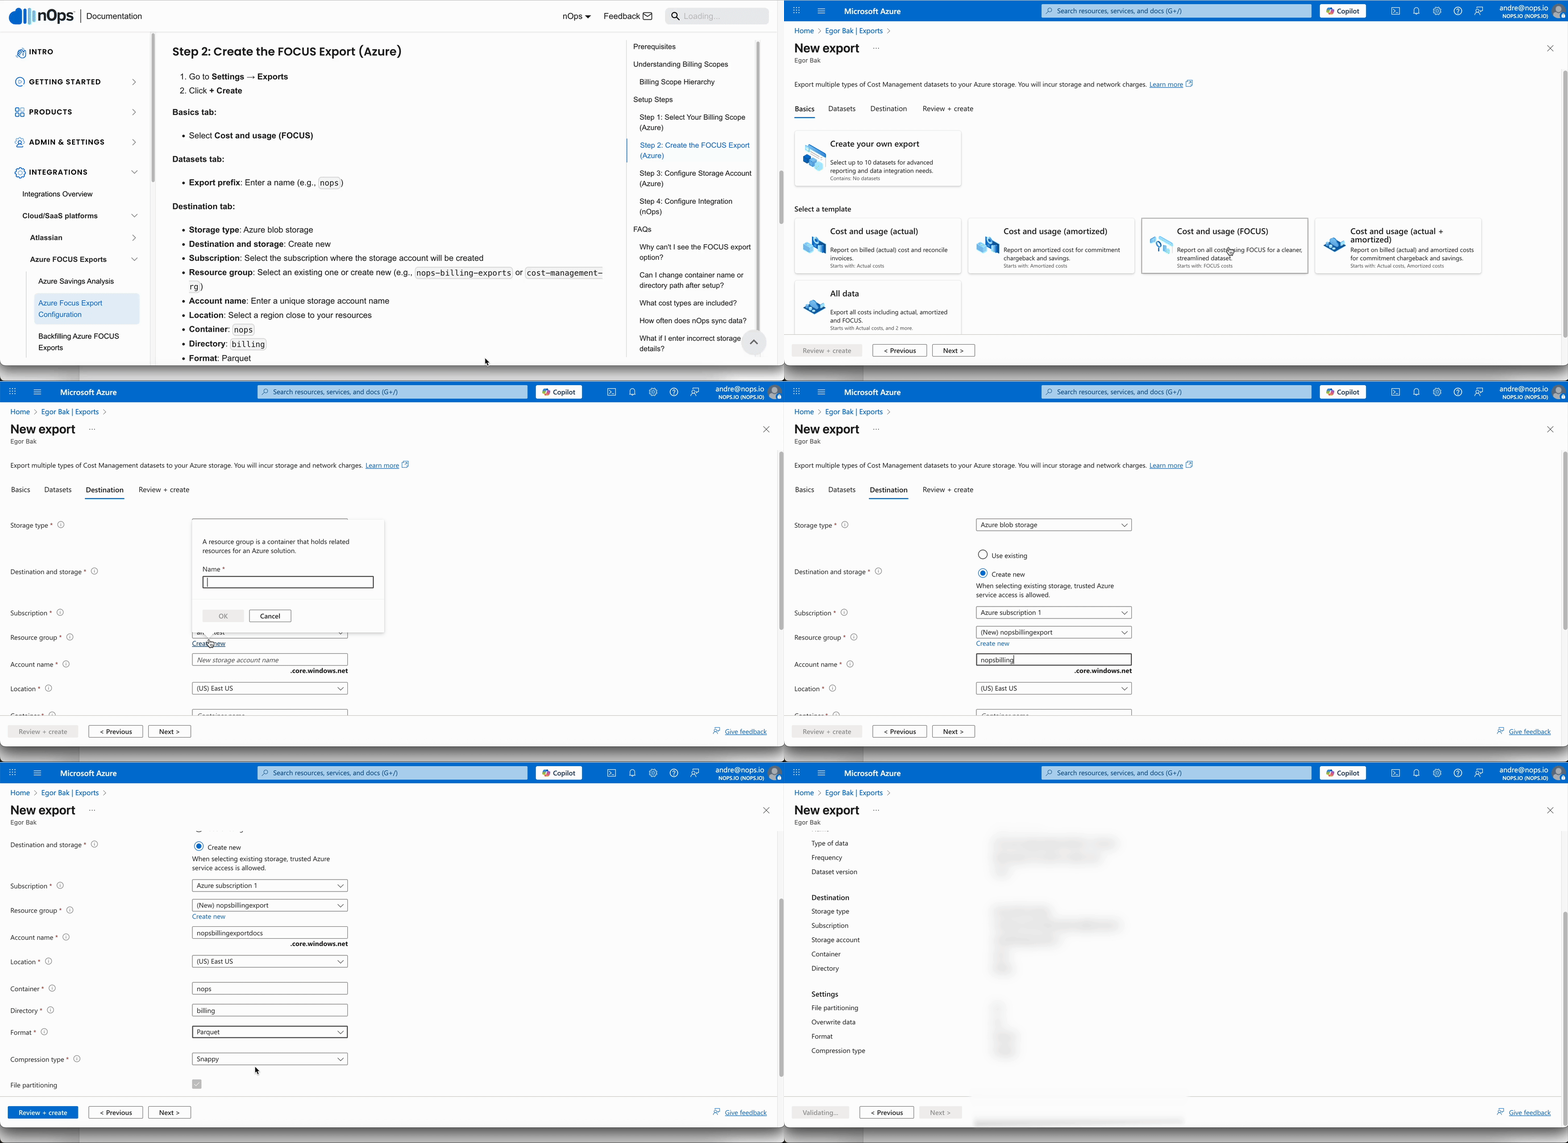
- Go to Settings → Exports
- Click + Create
Basics tab:
- Select Cost and usage (FOCUS)
Datasets tab:
- Export prefix: Enter a name (e.g.,
nops)
Destination tab:
- Storage type: Azure blob storage
- Destination and storage: Create new
- Subscription: Select the subscription where the storage account will be created
- Resource group: Select an existing one or create new (e.g.,
nops-billing-exportsorcost-management-rg) - Account name: Enter a unique storage account name
- Location: Select a region close to your resources
- Container:
nops - Directory:
billing - Format: Parquet
- Compression type: Snappy
- Click Review + create

If "Cost and usage (FOCUS)" isn't available in the Basics tab, verify you're at billing account scope and have a supported account type.
Step 3: Configure Storage Account (Azure)
-
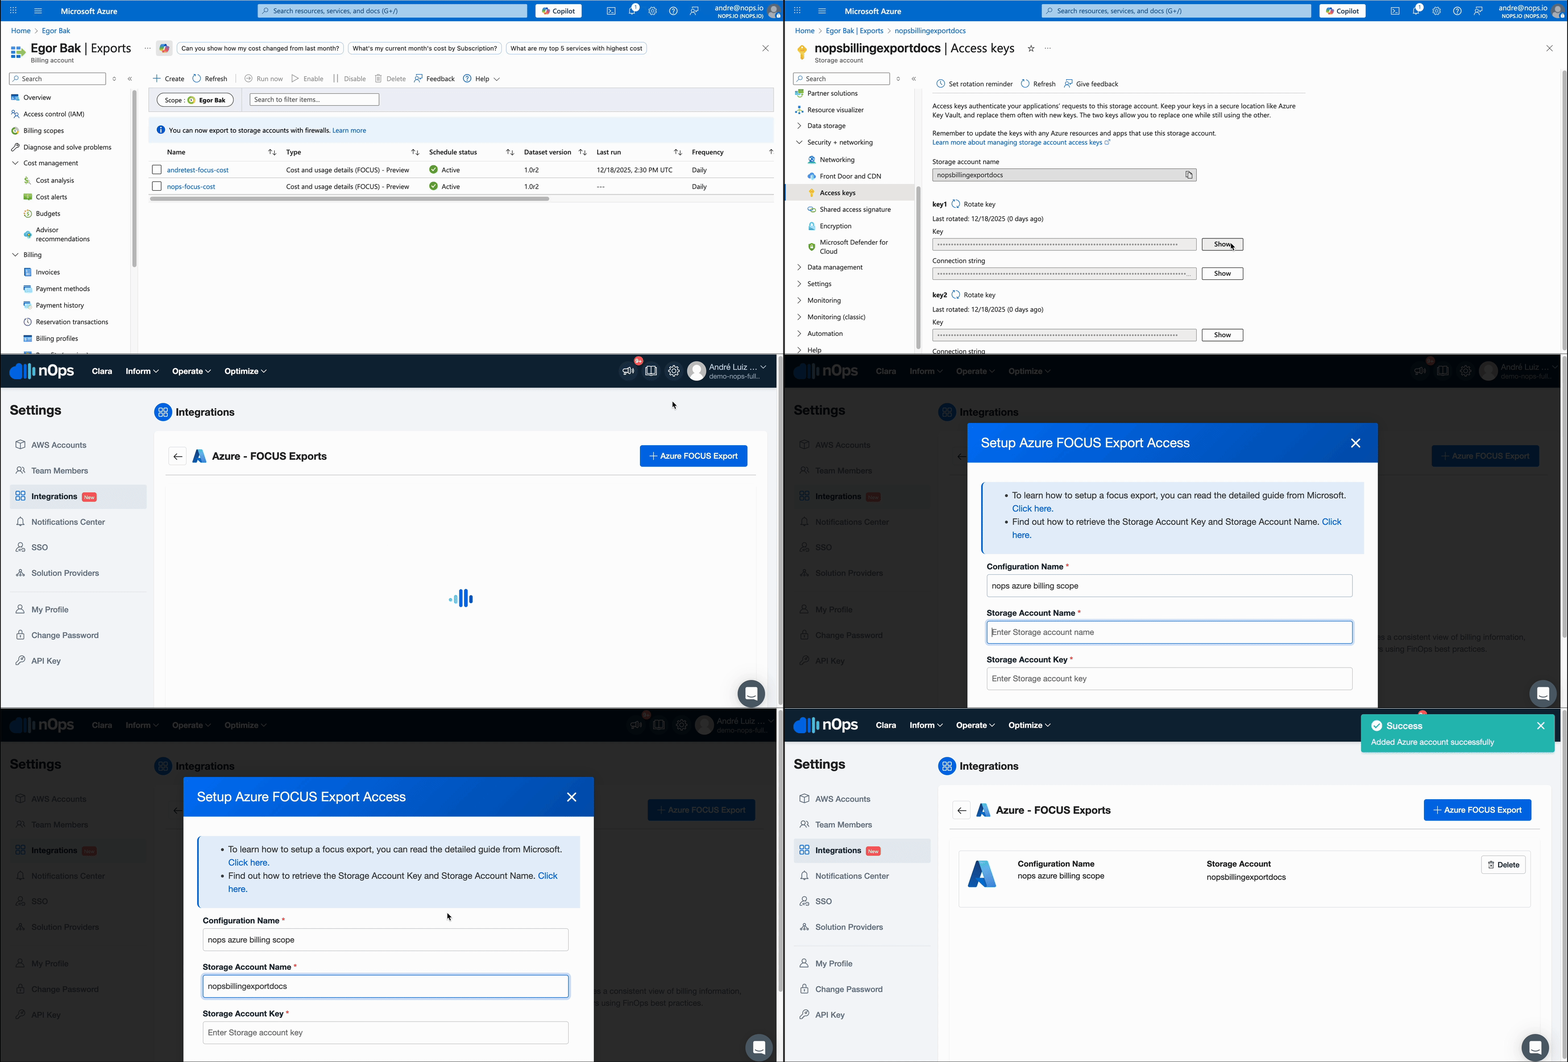
Click on your recently created export, then click the Storage account link
-
Allow nOps IP (only if your organization restricts public storage access):
Expand if your storage account doesn't allow public access
- Go to Security + networking → Networking
- Click Manage below "Public network access"
- Under IPv4 Addresses, add: 52.11.169.55
- Click Save
- Copy credentials:
- Go to Security + networking → Access keys
- Copy Storage Account Name (displayed at top)
- Copy Key under Key1 (click "Show keys" if hidden)
Copy the Key, not the Connection String.
Step 4: Configure Integration (nOps)
- Go to Azure Integrations in nOps
- Click + Azure FOCUS Export
- Enter:
- Configuration Name: Descriptive name for this integration
- Storage Account Name: From Step 3
- Storage Account Key: From Step 3
- Click Setup Account

FAQs
Expand FAQs
Why can't I see the FOCUS export option?
Three possible causes:
- Wrong scope: Switch to Billing Account scope (not subscription)
- Unsupported account: MOSP accounts don't support FOCUS—upgrade to EA or MCA
- Missing permissions: Request Billing Account Contributor or Enterprise Administrator access
Can I change container name or directory path after setup?
No. You'll need to delete both the Azure export and nOps integration, then recreate with new settings.
What cost types are included?
Everything under your billing scope: all subscriptions, reservations, and marketplace purchases.
How often does nOps sync data?
Every 24 hours. Sync issues appear in the integration status indicator.
What if I enter incorrect storage details?
The export will fail. Edit the configuration in Azure or recreate the export with correct details.